
Protein is a major food ingredient in livestock feed. Feed without protein in incomplete and not balanced.
This vital ingredient in livestock feed is required for growth, reproduction, and milk production. It is sourced from plant-based feeds like soybean meal, canola meal, and legumes, as well as animal by-products like fishmeal, blood meal and distillers grains. In ruminants like cattle, protein is essential for the gut microbes that help ferment food, while for all livestock, it builds muscle, supports immune function, repair worn cells and aids in overall health.
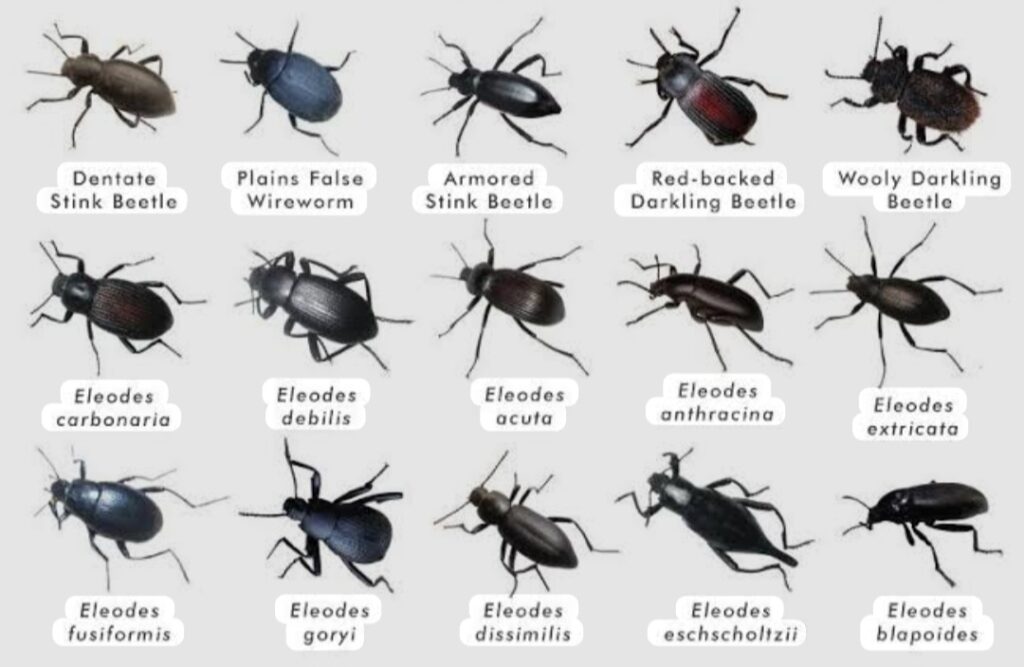
As of today, insects are reseached upon as vital source of protein not only for livestock feed production but also as human food and manure production. Such insects reported as source of protein include; Ricket, mealworm beetles, black soldier fly etc. Some of them have being discussed and posted under supremelights.org website.
THE MEALWORM
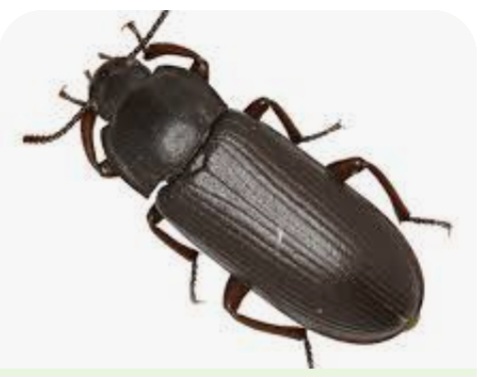
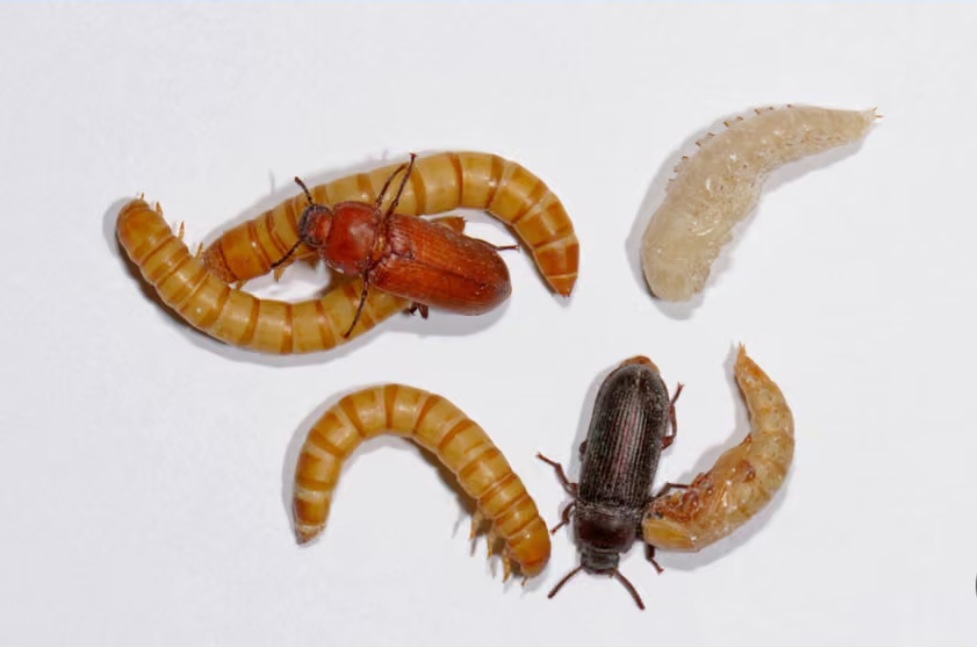
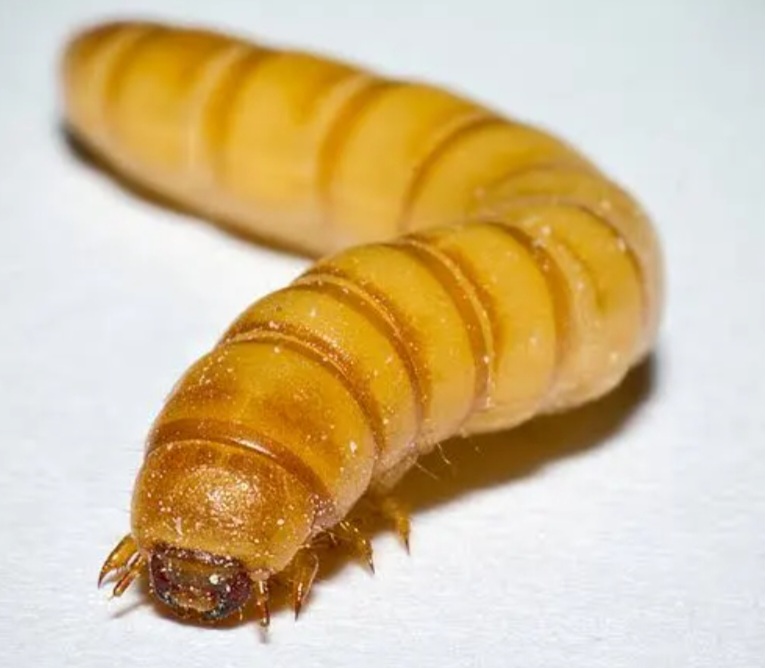
Mealworms also called yellow mealworm or golden grub are the larval form of the yellow mealworm beetle, Tenebrio molitor, a species of darkling beetle. They are not worms but larvae. They are a promising alternative protein source that has brought about a revolution in livestock food, particularly in livestock like monogastric animals such as poultry and pigs. Also, they can be feed to fish and compounded with pet food like parrots etc. They are nutritionally comparable to conventional protein sources like fishmeal and soybean meal, with high protein content, good amino acid profiles, and beneficial fats. Research shows that mealworms can replace a portion of the conventional feed without negatively impacting growth performance, palatability, or nutrient digestibility.
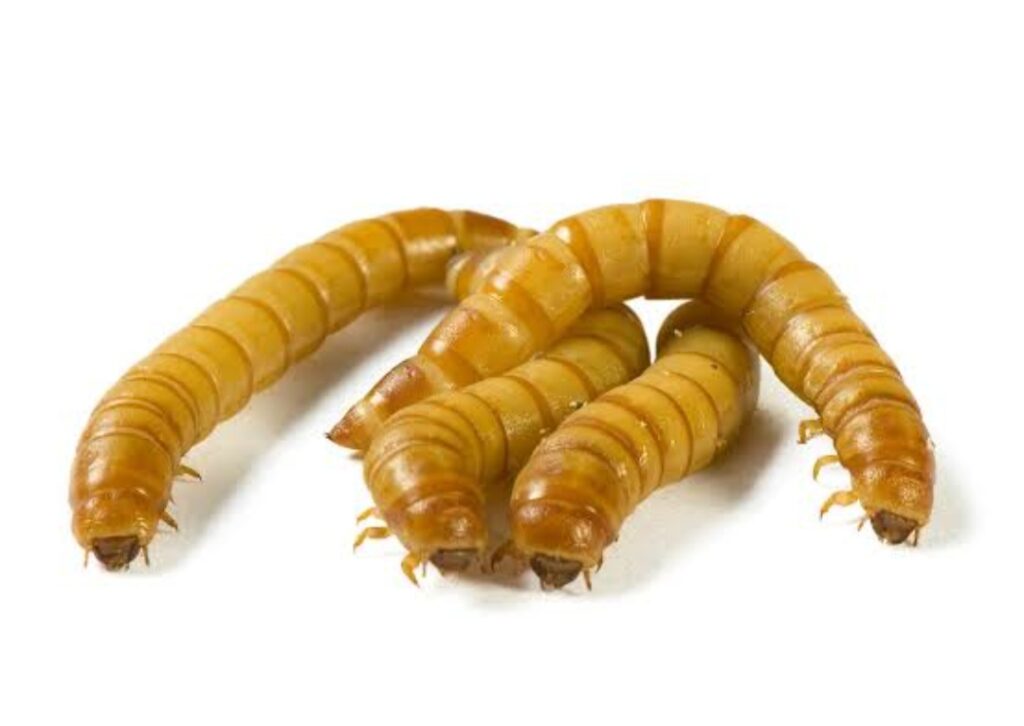
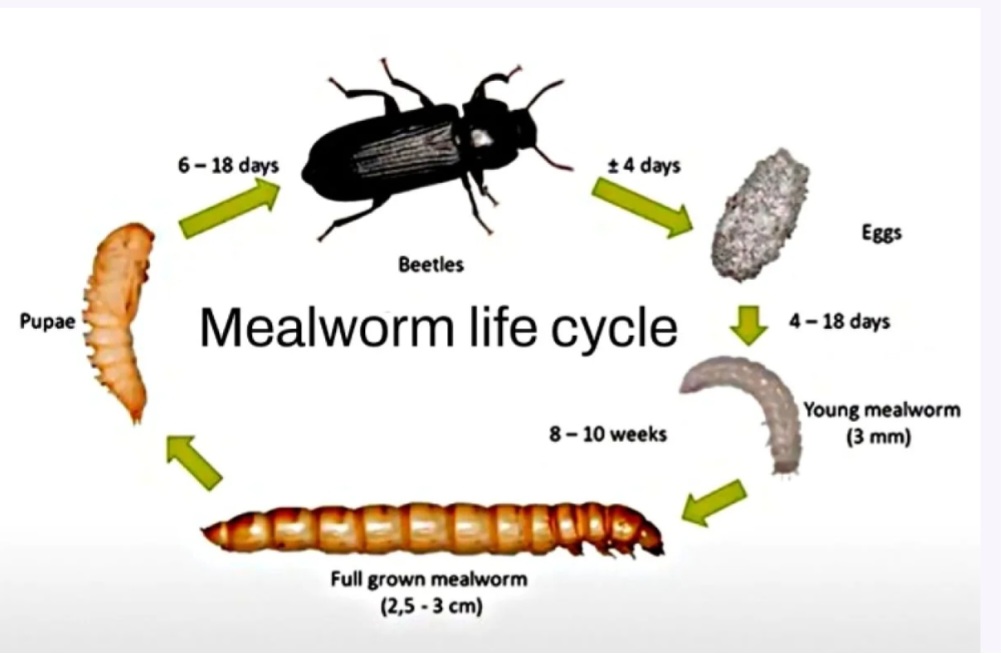
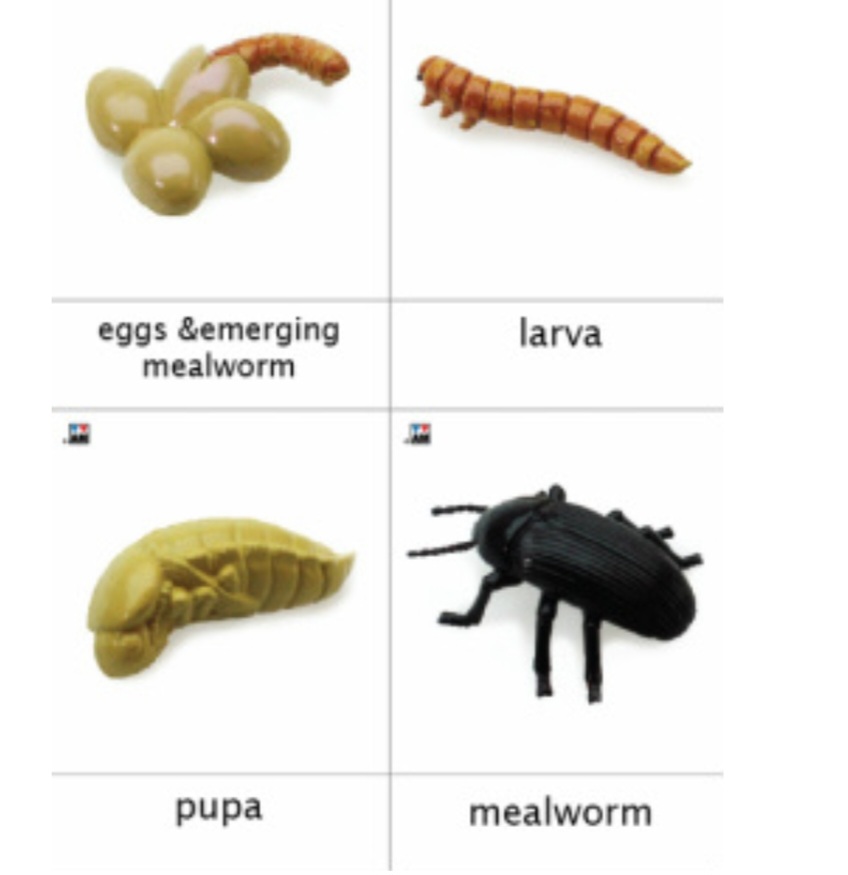
The T. molitor, the darkling beetle is dark brown or black insect in its adult stage. It produces larvae called the mealworm which is up to 1.25 inches (3.2 cm) long and the adults is about 0.75 inches (1.9 cm) long. It is a holometabolic insects, that goes through four life stages: egg, larva, pupa, and adult.
These beetles are cuticular in colour (pigmentation of the cuticle) which varies from tan to black. They can thrive anywhere like backyard, farms and even in the space.
SCIENTIFIC CLASSIFICATION OF MEALWORM BEETLE
Kingdom: Animalia
Phylum: Arthropoda
Class: Insecta
Order: Coleoptera
Suborder: Polyphaga
Infraorder: Cucujiformia
Family: Tenebrionidae
Genus: Tenebrio
Species: molitor
Binomial name: Tenebrio molitor
BENEFITS OF MEALWORM BEETLES
i. Tenebrio molitor is used in biomedical research.
ii. Mealworms can be a dietary source for animals and humans due to their high protein and fat content, as well as large amounts of fiber.
iii. They are also considered pests, especially in food storage. They infest and degrade the quality of stored grains or grain products.
iv. Mealworms are typically used as a pet food for captive reptiles, fish, birds, and some small mammals.
v. They are also provided to wild birds in bird feeders, particularly during the nesting season.
vi. They are usually used as fishing bait.
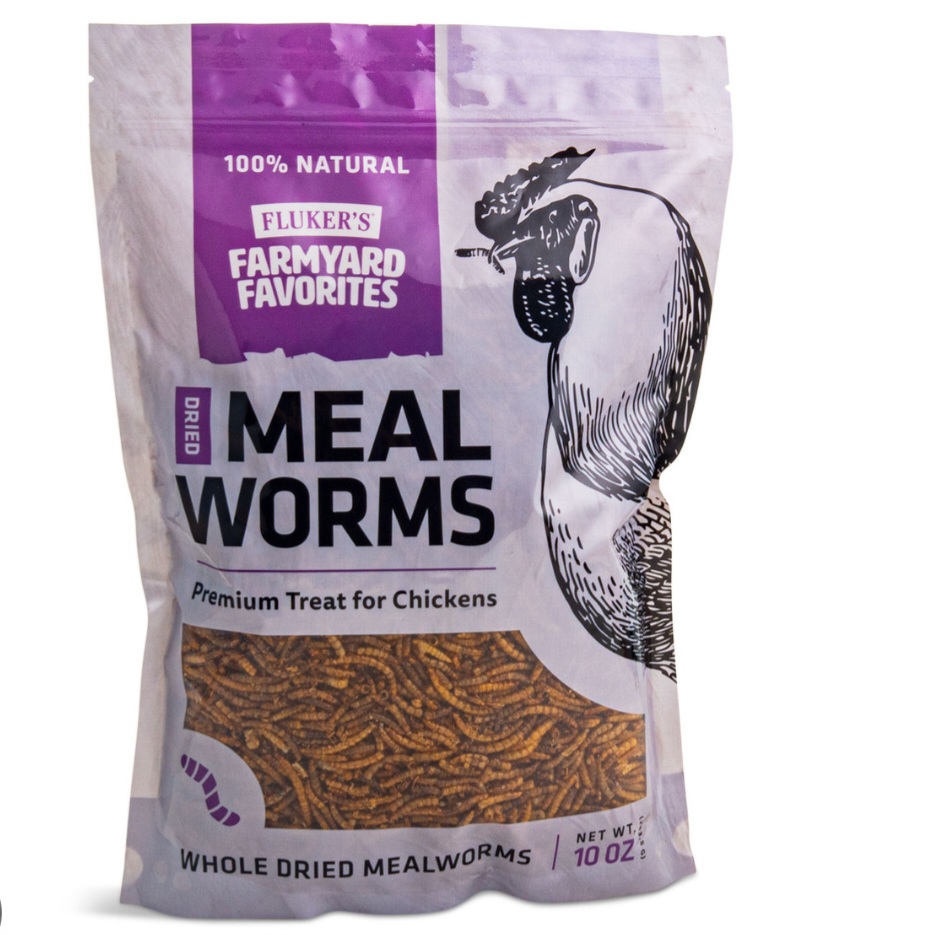
vii. They are commercially available in bulk and are typically available as products sealled in containers such as bran or oatmeal food.
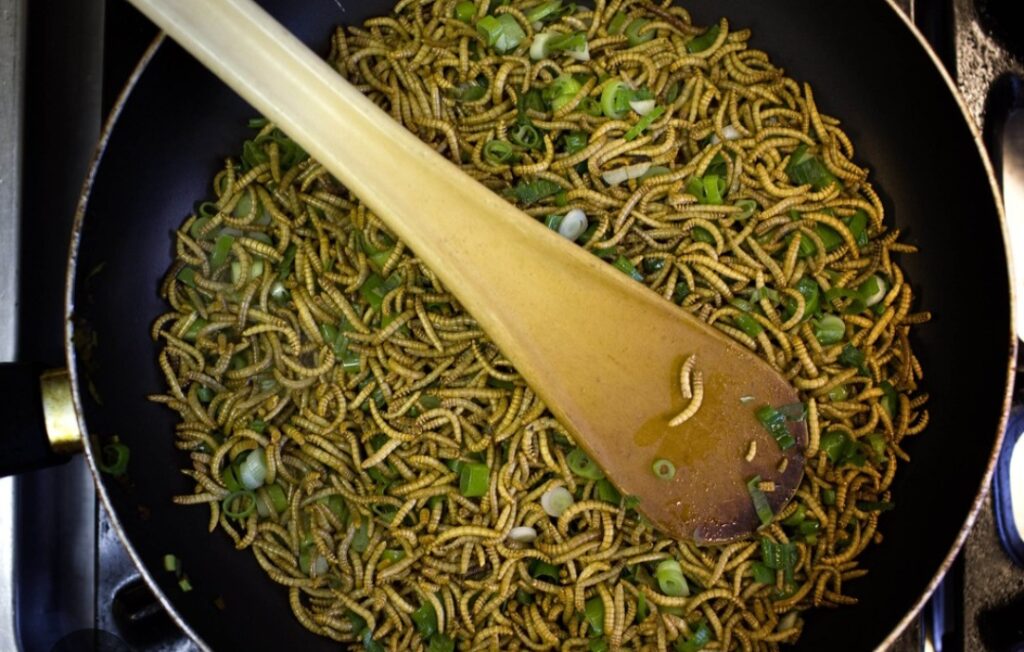
viii. Mealworms are edible for humans, and processed into several insect food items available in food retail such as insect burgers.
ix. They are rich in oleic acid, which may decrease low-density lipoprotein (LDL) and increase high-density lipoprotein (HDL) levels in the blood.
x. Mealworms have historically been consumed in many Asian countries, particularly in Southeast Asia. There, they are commonly found in food markets and sold as street food alongside other edible insects.
xi. Baked or fried mealworms have been marketed as a healthy snack food, since centuries ago.
In May 2017, mealworms were approved as food in Switzerland. In June 2021, dried mealworms were authorized as novel food in the European Union, after the European Food Safety Authority assessed the larvae as safe for human consumption.
xii. Mealworm larvae contain significant nutrient content. Every 100 grams of raw mealworm larvae contains 206 kilocalories and about 14 to 25 grams of protein.
xiii. Mealworm larvae contain levels of potassium, copper, sodium, selenium, iron and zinc that rival those of beef.
xiv. Mealworms contain essential linoleic acids. They have a greater vitamin content by weight compared to beef, B12 not included.
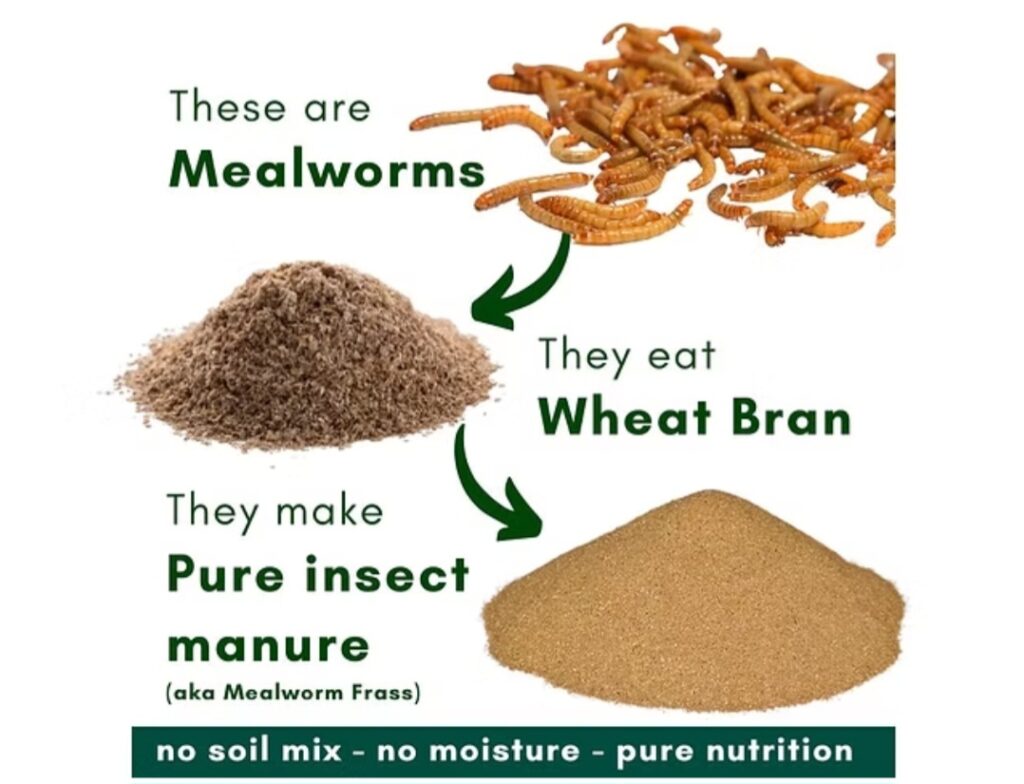
xv. Mealworms may be easily reared using available food products such as fresh oats, wheat bran or grain, with sliced potato, carrots, or apple as a moisture source.
xvi. The small amount of space required to raise mealworms has made them relevant for scalable industrialized mass production.
xvii. They are good natural recyclers that breaks wastes down into nutrients. They are capable of degrading plastic waste, cardboards, styrophones and polystyrene. And researches are ongoing on if they can degrade glass waste materials.
xviii. T. molitor can be the host of many different pathogens and parasites, including entomopathogenic microbes, protozoa, and tapeworms, which can decrease the mealworm beetle’s survival or reproductive success.
ixx. Mealworms do not carry any diseases harmful to humans, although one study indicated that they may act as an asthma sensitizing agent.
Due to these benefits derived from mealworms listed above, farmers now see them attractive for mass rearing, a technique that promotes disease transmission within the colonies.
DESCRIPTION
The mealworm beetle is a holometabolic insects, that goes through four life stages: egg, larva, pupa, and adult. Larvae typically measure about 2.5 centimetres (0.98 in) or more. Adults are generally 1.25 to 1.8 centimetres (0.49 to 0.71 in) in length.
The yellow mealworm beetle prefers a warmer climate and higher humidity. These beetles exist as male and female insects, thus, reproduce sexually. The male mealworm beetles release a sex pheromone to attract females to mate . After mating fertilized eggs are laid.
Mealworm beetles do not fly. They mate and they eat. They lay copious amounts of eggs after mating that cannot be seen. The eggs hatch out into tiny worms that cannot be seen with the naked eye. The worms called mealworms grow until they are ready to be fed to the animals. They possess a relatively hard exoskeleton made up of indigestible proteins and chitin. These worms usually shed this skin (exoskeleton) on regular basis, like a snake. As they grow to large sizes, their colour becomes white.
SPECIES OF THE MEALWORM BEETLE
There are several species of the mealworm beetles with varying differences. The yellow mealworm beetle differs from other beetles, due to the linear grooves that are evenly divided and run along the abdomen. The beetle has only four tarsal segments on its hind legs. Most other ground beetles, similar in size to Tenebrio molitor, have five tarsal segments.
In the case of the black mealworm beetle (T. obscurus), variations from the yellow mealworm beetles ranges from its size and their shape. The abdomen of the adult black mealworm beetle is more rounded and ends in a pointed tip, as opposed to the more rectangular and blunt-ended abdomen of the yellow mealworm beetle. The larvae of T. molitor are lighter coloured than those of T. obscurus.
There are other species of mealworm, one of which is the dark mealworm or Tenebrio obscurus, which matures more quickly than the yellow, and adult beetles lay more eggs. The confused flour beetle (Tribolium confusum) is sometimes referred to as a mealworm. The lesser mealworm (Alphitobius diaperinus [Panzer] is also known as the Litter Beetle, Black Bug or Darkling Beetle. “Superworms” (also called King Mealworms, megaworms, kingworms. Sometimes called Giant mealworms, although these are usually T. molitor treated with growth hormones) are Zophobas morio (sometimes listed as Zoophorbas). They are not treated with hormones, but are naturally larger (around 2-3 times bigger) than regular mealworms. They are native to Central/South America.
DISTRIBUTION
Mealworm bettle most-likely originated from the Mediterranean region. As at today, they have spread to many areas of the world as a result of human trade and colonization. They have spread Europe, USA, Asian countries, Africa, Australia and other continent of the world.
LIFE CYCLE
The mealworm beetle is a holometabolic insects, that goes through four life stages: egg, larva, pupa, and adult. They start as thiny eggs that hatches into mealworms and eventually transform into the adult beetles.
Depending on food and temperature, it takes about hundred to several hundred days for them to complete their life cycle.
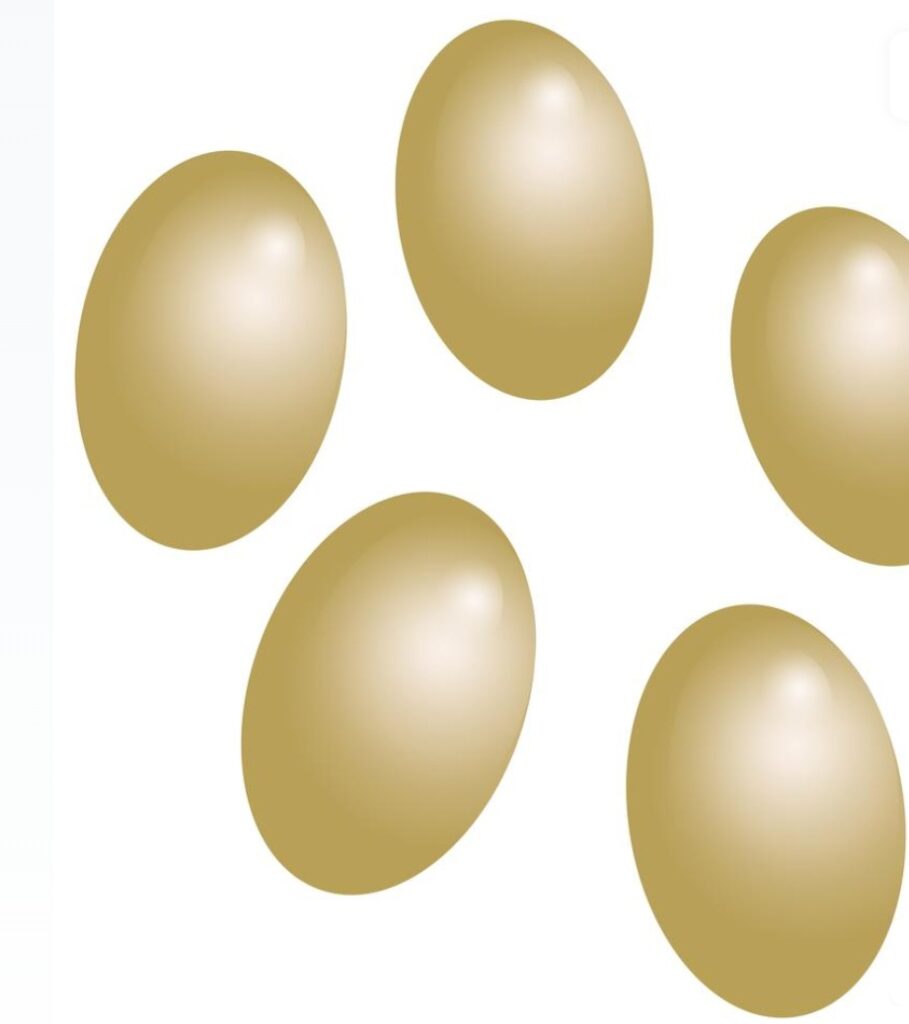
THE EGG STAGE: The eggs are laid by the female mealworm beetle. The incubation and hatching occur between 4-19 days after the female oviposits. Some sources say 20-40 days. The eggs hatch to give larva.
THE LARVAE STAGE: The eggs hatches to the larval stage at 10th weeks. And they become visible after about a week after hatching of eggs.
They burrow below the surface of the grain and undergo a series of molts (10-20 times, average of 15 times), shedding their exoskeleton (looks like Cornflakes). They typically measure about 2.5 centimetres (0.98 in) or more. They feed on vegetation and dead insects, and molt between each larval stage consecutively, or instar (9 to 20 instars as stated above).
The larvae incubate for a period of seven to eight days and a period of three to four days for the first instar. After the first instar, there is significant variation for the number of days in each instar period, though variation may be due to malnutrition or pathogens. Before emergence, most larvae typically go through 15 to 17 instars, with very few larvae going through the 19 to 20 instars. At the first instar, the newly molted larvae are whitish in colour, their exoskeleton has not hardened so they may be more digestible and gradually turn brown after the second instar.
With each successive instar, the body length of the larvae gradually increases , reaching maximum length of 0.98-1.38 inches , with about 200 to an ounce at the 17th instar. The body length decreases beyond the 17th instar. This last molt (instar) occurs about three months after the egg stage.
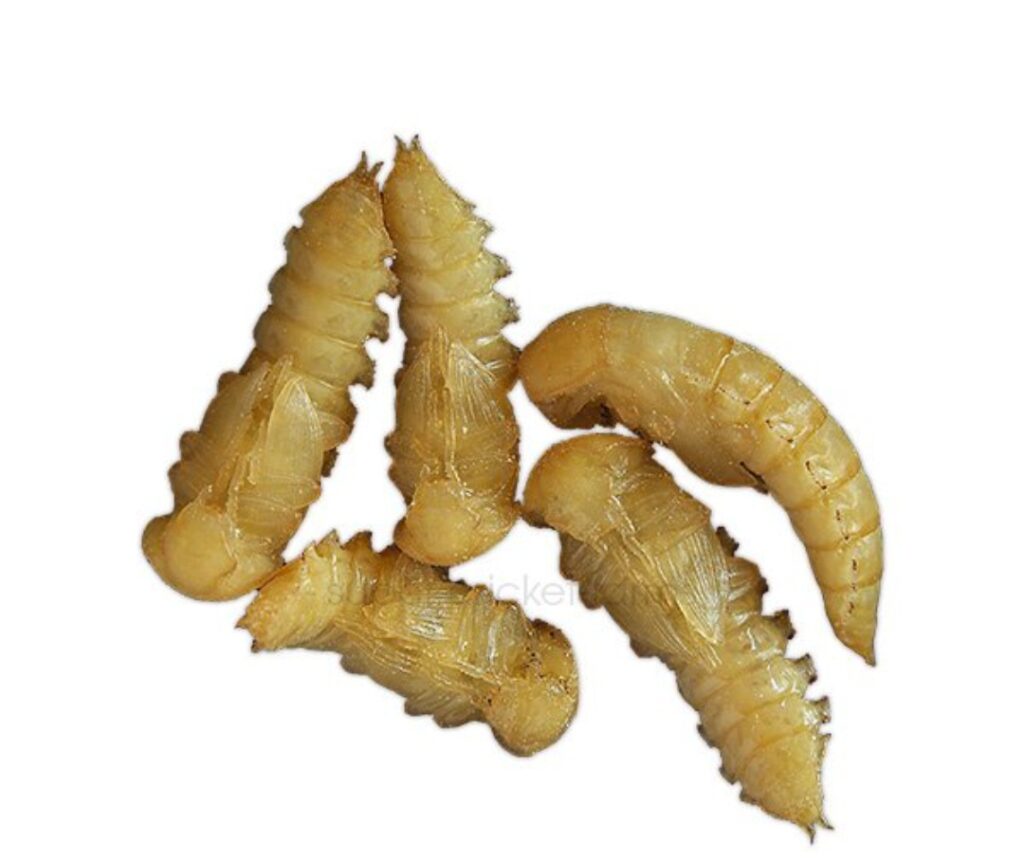
The fully grown larvae (worms) are golden brown and
The larvae come to the surface. They turn soft and plump, stop moving, curl into a “C” shape, and then transform into naked white pupae that turn yellowish brown after a day. They look sort of like alien grubs.
THE PUPA STAGE:
After the final molt at the larvae stage, they pupate ( that is, pupation occurs after the 14th instar, with most larvae showing total pupation between the 15th and 17th instars) . Pupating is when the larvae changes from worm to beetle. It is a cool and weird stage in darkling beetles. The new pupa is whitish and turns brown over time. They do not eat or move much. If the larvae stock are purchased at fairly large size, this transition may happen in a few weeks.
After 3 to 30 days, depending on environmental conditions such as temperature, the pupae metamorphosize into beetles ( that is, emerges as an adult beetle).
Larvae and pupae generally shared a common nutritional profile: lower contents of crude fiber, crude protein etc.
THE ADULT BEETLE
Adults are generally 1.25 to 1.8 centimetres (0.49 to 0.71 in) in length. They live for about 3 months. This short life span of the beetle gives reason why farmers prefer to leave some worms to pupate, so they can turn into beetles and keep the cycle repeated.
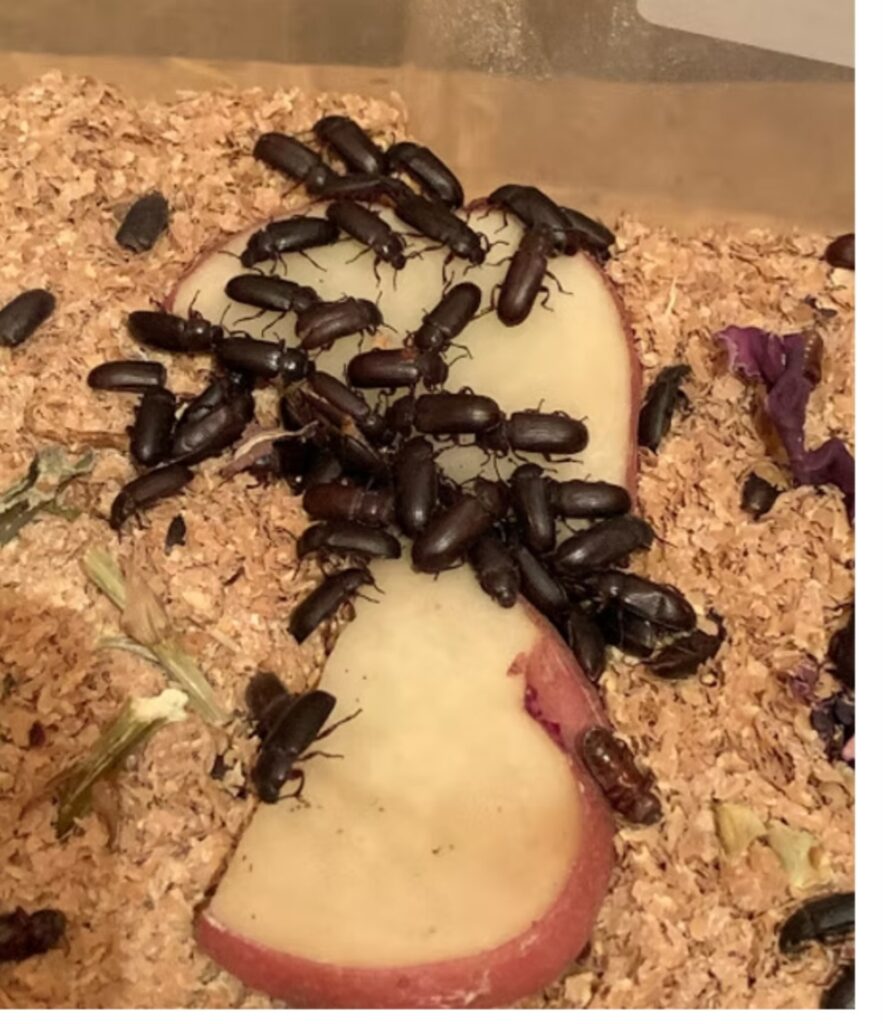
The freshly hatched beetles are quite pale, the colour of the wheat bran, then they turn brown, then finally black.
At first the beetle is white/light beige with a soft shell, and then it darkens and hardens to red, brown, and finally turns dark brown/black after about 2-7 days. The beetle is slightly flat. Males and females are indistinguishable. They can not fly, but they can move very quickly.
Some after hatching do not develop properties like wing cover and look ragged. These ones can quickly be sorted and fed to the poultry birds.
Beetles lay their eggs 9 – 20 days after emergence. They lay for two or three months, and then die. Each female beetle lays about 275 tiny, bean-shaped white eggs – about 40 per day. The eggs are seldom seen because they are sticky and rapidly become coated in substrate.
It is important to note that;
i. offspring produced by older beetles do have shorter larval stages than those produced by younger beetles. Also, larvae from the older beetles do aquire a rapid weight increase at an earlier age than those from young parents.
ii. as parental age increases, the amount of hatched eggs decreases .
iii. from researches, it has been reported that when eggs are laid during the first two months after emergence, approximately 90% of the eggs will hatch. But when the eggs are laid after four months of emergence, only about 50% will hatch.
iv. It has also being reported that larvae from young parents grow at a slower rate, compared to larvae produced by the same parents, nine weeks earlier (old stock). At 30 °C, there were no other effects of parental age on the larvae.
REPRODUCTION
During reproduction, the male Tenebrio molitor produces and releases a sex pheromone to attract the female beetle. Pheromones are chemical signals that function as mate attractors and relay important information to prospective mates.
In the case of inbreeding, a reduction in the attractiveness occur. This is due to the reduction in the sexual pheromone signaling released by the male mealworm beetles.
The females are more attracted to the odours produced by outbred males than the odours produced by inbred males. The reduction of the male signaling capability may be due to increased expression of homozygous deleterious recessive alleles, caused by inbreeding.
The mealworm beetle breeds are prolific. A female can lay between 70 – 100 eggs at a goal and about 500 eggs per year. The eggs are usually laid in a dark moist place with plenty of available food. The males through their aedeagus insert sperm packets into the females. Within a few days, the female burrows into soft substrates and lays their eggs. They prefer laying in warm and dry area of the substrates. lots of food must be placed on the substrate for them to feed upon and their newly emerged larvae. The larvae, which are creamy brown are initially thiny. They grow to about 1 inch long and start shedding their skin. This is called molten. This shedding is about 10 to 14 times before they form the pupae. The pupae stage can can last to about 6 to 300days depending on the temperature. She had a lifespan of about 6–12 months ( that is, a year).
FOOD FOR THE BEETLES AND WORMS
Farmers can buy some of the food items from an animal feed store or bulk food store. These feed are diverse in numbers. Commonly used food sources include: corn cobs (hiding inside), wheat bran, chaff.
rolled oats (oatmeal – uncooked), oat bran, cornmeal (not cornSTARCH), chick (poultry –fowl or pheasant and turkey) starter/mash ( very nutritious), feces of organisms, eggs, vegetables, fruits, ground dry dog or cat food encourages pupation. It can also be given to worms prior to offering them to birds to increase protein content. Cabbage, raw potato, slice of bread, romaine lettuce, kale (high in calcium), yam (also nutritious), apple slices (1/4 of an apple is enough for 1,000 mealworms, once or twice a week). Note: apples get moldy too quickly. Celery (For example, bottom end of bunch), broccoli stems, carrots (grated carrots on a plastic lid), banana peels, or asparagus chunks. Cabbage leaves ( Cover the cabbage with a cloth to keep it from drying out if a heat lamp is used in the habitate). Leftover low sugar cereal, birdseed (e.g., milo), wheat flour (whole wheat for added nutrition), grain mixture:
(10 parts oat or wheat kernels,
10 parts rolled oats (oatmeal) or whole wheat flour; 1 part wheat germ or powdered milk; and 1 part brewers yeast.
10 parts wheat feed, 10 parts rolled oats, 2 parts brewers yeast rolled oats 10 ounces) etc.
Along side the food materials, supplements can also be added. Such can be mixed with the dry food/bedding. These supplements include; wheat germ, finely ground egg shells or cuttlebone (for calcium), soybean meal, wombaroo insectivore mix, fish flakes, fine mouse cubes, bone meal, graham (whole wheat) flour, and dry brewer’s yeast (provides proteins and trace elements essential to the insects’ growth and makes larvae grow more). Brewer’s yeast can be obtained at health food stores. Sprinkle vegetables/fruit with calcium and vitamin supplements to add nutritional value. Experiments where skim milk (calcium source) was added to wheat bran at the ration 1:3 or 1:2 ratio, yielded better growth than wheat bran alone.
Note:
i. wash/peel the vegetables first before usage to prevent the introduction of pesticides.
ii. Place fruits and vegetables like potato and apple slices side up, even with top of bedding. By putting the skin side down, the bedding/dry food should be prevented from getting too moist.
iii. Use of kiwi skin should have about 15% of fruit still in it (after scooping out the pulp with a spoon and eaten). Mealworms are reported to grow about 3 times fatter and 30% longer in just 2-3 weeks when fed with this fruit and wheat bran used alone as bedding material. The worms also use the kiwi skin as a “cave” as it drys and curls up.
iv. The following materials should be used to serve the food of the beetles and replace the food on it every 2-3 days or weekly;
a little plastic lid, tinfoil pie plate or a piece of cardboard, or stick a toothpick in it. Burlap or newspaper can also be used.
v. Small amounts of moist cat food (like Tender Vittles) can be used. This will provide extra protein for the beetles.
vi. The bedding can be spritz lightly with water on a daily basis. Do not soak, and do not wet bedding. Also a moist (not wringing wet) paper towel can be used and changed on daily basis. A piece of aluminum foil can also be placed under the dampened burlap/paper to prevent the grain from getting wet.
vii. The mealworm larvae can be fed by sprinkling the food into their trays in the case of feeding with grinded or powdery food stuffs.
viii. The feeding frequency depend on the number of larvae but most times, the food os added daily or every 2 to3 days.****
ix. They can eat five times per day. A healthy T. molitor larvae usually prefer diets with a lower protein to carbohydrate ratio, but will shift if there is an infection. For example, bacteria, tapeworm etc infection.
MEALWORM FARMING
Mealworm farming involves raising mealworms in containers with a grain substrate, such as oats or wheat bran, and a moisture source like carrots. The process requires creating a habitat with proper bedding, feeding regularly, and separating the different life stages (larva, pupa, beetle) to continue the breeding cycle.
IMPORTANCE OF FARMING MEALWORMS
Harvested mealworms can be used as
1. a food source for pets or livestock like poultry
2. ground for their frass (excrement), which is a valuable fertilizer.
SETTING UP THE HABITAT
Some of the materials required to set up the habitat include;
i. CONTAINER OR PLASTIC TUBING: The container can be a used plastic bins or tubs or shallow trays with lids that have ventilation holes covered with a screen to keep pests out. The container or plastic tub should be shallow, approximately 6 inches. This height will prevent the worms from climbing the plastic. Other materials like wooden materials etc should not be used as they will easily climb them.
ii. SUBSTRATE: The container should be filled with 2-3 inches of a dry substrate like oats, wheat bran, or cornmeal. Do not overfill, as this can encourage escape. These substrates can serve as their food and also their bedding as they start out. The containers should be placed in a cool dark area because mealworms are naturally nocturnal. Therefore, they prefer low light conditions which help reduce stress and keep them active. The container should always be refilled by putting 2-3 inches of the substrates regularly when the level drops.
Never start by using oatmeal substrates because it may be harder for the microscopic worms to eat the larger oats than the bran.

iii. FOOD AND MOISTURE: The worms should be fed/watered using vegetables. These vegetables are source of moisture for the worms. This should be replaced every few days to prevent mold growth on the fruits. The fruit vegetables like carrot, apple or potato peels and leafy vegetables can be off cut. Enough of them should be placed in the container for the beetles and worms to suck the moisture out of them and eat them.
As the worms grow in size, this will determine the size of the vegetables to place in the container. For example, smaller size worms can be fed with small sized, chopped up vegetable. As the worms grow larger, a whole vegetable can be laid on top of the substrate, the worms will wiggle around it and pull it under.
Other vegetables that can be fed to them include Brassica,Cabbage, lettuce etc, All are very cheap to source for
RAISING THE MEALWORMS
To breed the mealworms, both larvae and adult beetles are needed.
The following factors should be considered when rearing the mealworm;
i. POPULATION DENSITY: Raising the mealworms involve creating a crowded environment with a large number of the beetles. This will help prevent them from getting stuck on their backs.
ii. SEPARATE THE STAGES: After the eggs hatch, separate the larvae from the pupae (the stage before the beetle) into their own bin to allow development into adult beetles.
iii. COLLECTION: Use a three-tier system or sifting to separate the different stages. Mealworms and eggs can be collected for use, while beetles are returned to the breeding bin.
iv. FEEDING: Feed the mealworms regularly, as they need a consistent source of food and moisture.
v. CLIMATIC REQUIREMENT: The yellow mealworm beetle prefers a warmer climate and higher humidity.
a. LIGHT: Consistent with the name darkling beetle, they prefer the dark. Keep the container out of direct sunlight. However, one source indicated that if mealworms develop faster when provided with light. To obtain a supply of adult beetles in the fall, the usual hibernation period of the dark mealworm (a different species) can be prevented by exposing the fully grown larvae to continuous light.
b. MOISTURE AND RELATIVE HUMIDITY: Mealworms do require moisture. Too little moisture slows growth and reduces size. Too much can produce mold.If larvae are provided with dry food, they can survive and produce one generation a year. If they are provided moisture, they will undergo six generations per year will be fatter.
Beetles lay more eggs when the relative humidity is higher – ideally 70% (55-80% is good). In one experiment, at a relative humidity (R.H.) of 20%, beetles laid an average of 4 eggs each, but at 65 percent R.H., they laid an average of 102 eggs each.
Adult worms also become more active between 90 – 100% R.H. Keeping the culture moist also prevents cannibalism. More is not better. If you put too much in, or leave it too long, it will get moldy or become a gooey mess.
vi. TURNING UP AND INSPECTION OF WORMS: A regular check-in on the worms should be done every few days.
The worms should not be stirred up more than necessary. This practice brings the poopy bits up and can kill or damage the freshly molted worms and pupae.
In addition, in the case of the beetles, ignore the dead beetles, as they will be eaten by the other beetles.
vii. REPITITION OF THE REARING PROCESS: Every 4-6 weeks, restart the whole rearing process in a new bin ( thay is, move the beetles over). This means starting a new bin each month. For example, with a 6 month grow out, the farmer will have 6 bins on the go – 5 will be for various stages of the worm growth and one as the main beetle bin.
It is important to note that if the beetles run short of food and moisture, they will eat some of their eggs as a moisture and food source. (so keep them well fed). They should be moved every 4 weeks to a fresh bin so as to gives a larger harvest.
TIMETABLE
Due to the length of days required for mealworm beetles to complete their life cycle, farmers need to prepare a time table for their production process. For example, if worms are to be produced in the spring, start the colony in November or December. For each 20 beetles raeared, farmers should get about 350 adult mealworms in 200 days.
When the colony is kept at room temperature (~72°F.), it will take a much longer time for the pupa to convert to the beetle stage.
PURCHASE OF BREEDING STOCK
Do not buy “giant” mealworms for breeding (or feeding), as they may have been treated with an insect growth hormone to discourage them from morphing into beetles, so they will grow larger. If giant mealworms do morph into beetles, they will be sterile.
Instead, visit the local pet store if they have any adult beetles that can be purchased.
HOW TO START A NEW BIN
To move the beetle to a new bin is easy. This can be carried out by delaying the usual addition of the fresh vegetables for a couple of days OR bring in a ringer (brassicas, broccoli, slice of apple or squash). On doing this, the beetles will become hungry and thirsty and on siting their food and water source, they will become extra happy, feed and drink ferociously.
These vegetables should be placed on the wheat bran substrate for about 30 minutes and check. By this time, the beetles would have covered the whole food and water source. The vegetables should then be picked up (the beetles would hold on it), then move it to the new bin. Either put the vegetables in or gently knock the beetles off it into the new bin.
The substrate in the first bin where the beetles where moved should not be discarded but addition of fresh vegetable chunk should be placed into it. This will make some beetles hiding in the substrate to move up and the transfer continues. This can continue for 3-4 days. Do not dig through or sort the bin, all living beetles within the substrate will eventually come to the top and check out new food although a few will still be straggler beetles in the substrate.
THE MEALWORMS
In the case of the mealworms, after the eggs hatch, sort the large worms from the small ones. Place the large mealworms in a shallow plastic sweater container. Prepare the container by:
Cutting the top to make a hole for ventilation purposes. Use a hot glue gum to adhere window screen to it to keep critters and moths out. Add 2-3 inches of bedding/food substrates like wheat bran, or a 3:1 ratio of wheat bran to dried skim milk, or 4 layers -1/4 inches layers of poultry mash (non-medicated)
separated by layers of burlap or newspaper, or 10 parts oat or wheat kernels, 10 parts whole wheat flour, 1 part wheat germ or powdered milk; and 1 part brewers yeast.
For moisture, add a small wedge of cabbage, broccoli or half a potato. Place it on top of a plastic lid or newspaper to keep bedding dry. Replace vegetable at least weekly or if moldy.
Ideally keep the container temperature at around 80°F (room temperature is fine too) and around 70% relative humidity. Use a moistened sponge in a baggie/ open container (open side up above grain) for additional moisture.
Periodically (for example, every 1 to 2 weeks) sift out beetles from bedding that will contain the eggs/tiny worms. (The beetles may eat the eggs.)
Once worms are big enough, sift frass (waste) and bedding out once a month, dispose of in garden or use for compost making or feed to poultry to pick the left over worms.
Wash and dry container, return worms and add new food.
MAINTAINING THE FARM HYGIENE
Some of the management practices required around and in the rearing habitat include;
i. Remove old vegetable matter and other waste periodically to maintain a clean environment.
ii. Humidity: Control humidity to prevent mold growth. If the habitat gets too humid, the oatmeal may grow fungi, which can harm the mealworms.
iii. Frass: The mealworm and beetle waste (frass) can be collected and used as a garden fertilizer.
iv. fecal matter management: Worms poop, is like powdery material that can barely be noticed. As worms in a bin are moved to other bins, there is the possibility of odour build up. These are odour from the mixture of the feces and the substrate. Thus, the substrate- feces mixture can be changed for reuse of the bin.
This waste can be fed to poultry or composted.
v. Always use a clear container so as to see how much frass (waste) has accumulated. The container should be made of plastic and must be shallow . A shoe box size or sweater storage container (Rubbermaid, Sterilite, etc.) will suffice. A pail can also be used.
vi. The container should have a larger surface area so as to improve survival of the beetles or worms by dissipating heat. Too many worms stored in too small a container will overheat and die (e.g., 5,000 worms in a 2 gallon pail=dead worms.) The mealworms should probably be only 3-4″ deep.
vii. The container should be well ventilated and covered. Ventilation prevents mold growth. Darklingbeetles do have wings, but can’t fly. Some commercial farmers do not cover their bins. Such practice exposes the beetles and worms to pests like mice, rats, cockroaches and some spiders. They will eat up the mealworms. Therefore, the container should be kept closed. A tight fitting cover will also keep flour
and grain moths out.
Note: If the container has a plastic cover, drill holes in it. If condensation forms on the inside of the lid, more holes are needed to be made on the cover. After this, a section at the middle of the lid should be cut out and fine window screening material should be glued to the inside of the lid, around the hole. This will sllow proper ventilation. The window screening also serve as a cover for the container.
viii. Temperature: The ideal temperature to maximize growth is 77-81ºF, but~ 72-74ºF is also ideal at the Mealworm stages.
Mealworms beetles do reproduce in temperatures ranging from 65-100 F, but temperatures above 86ºF negatively impact growth and development (inhibiting pupation). The duration of the pupal stage will depend on temperature. It is six days at 91.4ºF, seven days at 80.6ºF, ten days at 75.2ºF and thirteen days at 69.8ºF.
Temperatures below 62ºF may halt reproduction. In cold temperatures the larval stage can last two years. Chilling worms and then re-warming them may significantly delay pupation. Prolonged exposure to temperatures below 40ºF may kill the worms.
ix. Lightening materials can be used to heat up the room where the containers are placed. Fr example, a 500 watt rheostat controlled ceramic reptile heater can be suspended over the container to keep temperatures high enough for the worms and beetles.
If such heating materials are installed, provision must be installed for air flow. Such can be window screen hole in the rearing room. This will prevent drying everything out( that is , the food, substrates and beddings).
x. By placing adult beetles on moist blotting paper overnight may increase egg production.
xi. To increase the relative humidity of the environment where the rearing container is placed, put a moist sponge inside a plastic baggie (open) and lay the baggie on the bedding. Or,
Place a small but tall (so the beetles do not drown) bowl filled with water in the middle of the farm to increase relative humidity. A sponge can be placed in the bowl to increase the moist surface area.
Lots of success has been recorded using this methods.
Also, the bottom of the sponge can be placed in a plastic baggie (to prevent the meal from getting wet and moldy) and stand it upright in the corn or oatmeal. Re-wet the sponge weekly, and wash it when needed.
xii. The more nutritious the food, the more nutritious the mealworms will be. Place the food, substrate and bedding in layer of about 2-3 inches deep. Replenish the food often, as the worms eat a lot. Change the food out about once a month. Feed the beetles too (same stuff).
xiii. The use of fine particles food, substrates and bedding like fine wheat bran, corn meal, and chick starter, make it easier to sift out large mealworms. Larger particles (e.g., rolled oats) with larger worms make it easier to sift out frass, therefore, food wastage should be prevented. Newly hatched worms are so tiny that they will go through a screen with the frass.
ivx. Cloth or newspaper covering: Partial covering of the food surface (about 2/3) with several layers of newspaper, brown grocery store bags, paper towels, or a folded piece of cloth can be done. Leave space between the paper and edges of the container.
Worms will crawl between the newspaper layers to pupate, which makes it easy to collect them.
xv. For the beetles to lay eggs, some farmers place cloth in the container on which the eggs are laid. However, carrying out this practices might make it difficult to get the beetles off the cloth when maintaining the farm. Beetles also do lay eggs directly on the food source. Also, thick, clean, dry hunk of bark can be placed on top of the bedding. The beetles will lay eggs on it.
xvii. SHIFTTING OF BEETLES
The reason for siftting out beetles is because, they may eat the eggs. Shiftting is carried out using a Sifter. The sifter can be made with a 1/8 inches hardware cloth or nylon reinforced screen tacked onto a wooden frame. If a sifter is made to fit in the bottom of the mealworm container, the frass will fall through the sifter, making it easier to clean the container. The fine hardware cloth may be difficult to locate, instead, a wire mesh basket from an office supply store, or use a device like a Double Over-the-Sink Colander with extendable arms can be used.
EFFECT OF MEALWORMS ON RECYCLING AND DEGRADATION OF POLSTYRENE
Polystyrene foam decreases T. molitor fecundity, but the beetle can fully develop using the plastic as its primary source of food, which makes it an interesting alternative to recycle polystyrene.
In 2015, it was discovered that 100 mealworms can degrade polystyrene into usable organic matter at a rate of about 34–39 milligrams per day. Research has reported that no difference occur between mealworms fed only with Styrofoam and the mealworms fed with conventional foods. Microorganisms inside the mealworm’s gut are responsible for these degradation of the polystyrene, proven by reducing the property of degradation when mealworms were given gentamicin.
Two factors can bring about the reduction in the degradation of this polystyrene materials.
i. When the mealworm gut microbes are isolated from their colonies in the mealworm’s gut. These microbes isolation has proven less efficient than those bacteria within the gut.
ii. When the mealworm’s microbiota is disrupted by an antibiotic treatment, it loses its ability to digest polystyrene, suggesting that its associated gut microbes are essential in the digestion process.
Bacterias in the gut of the mealworms which assist in the degradation of polystyrene in in vitro include: bacterium Exiguobacterium firmicutes, which can be isolated from the midgut of mealworms,
HEALTH RISKS
Some evidence suggests that T. molitor may pose a health risk,
i. as humans and animals can consume the eggs and larvae of the beetle with grain-based food. Although they are usually either digested or are excreted with feces, sometimes, they are able to survive and live in the alimentary tract. The first cases of T. molitor larvae in human organs date back to the 19th century, were observed in the gastrointestinal tract of the alimentary canal, including the stomach and intestines.
ii. There were other cases, such as a reported ulcer infestation of T. molitor in an AIDS patient and a concerned urinary canthariasis in a ten year old boy in Iran in 2019, which was the last reported human case of canthariasis caused by T. molitor.
iii. However, there are very few reported cases of live larvae in animals, and there are no reports of gastrointestinal canthariasis in farm animals.
iv. One farmer indicated she experienced severe upper respiratory infections after handling mealworms and was concerned there might be a connection. She then used a mask and gloves when handling them, but eventually decided to abandon farming.
v. Another had what appeared to be an allergic (respiratory) reaction to the farm – possibly the frass (but not to mealworms stored in a refrigerator.)
HARVESTING OF THE WORMS
The mealworm larvae can be harvested and offered to birds or separate them from eggs and beetles and continue the rearing process. The reach harvestable size after 2 to 3 months of hatching. To harvest the mealworms, use a stainless steel siever to collect the worms.
Put a sheet or newspaper or grocery store bag or a plastic lid on top of the colony. The worms will crawl under it in a few hours. Repeat until all worms are harvested out and then replace the bedding.
Another alternative method is to hold back on moisture for a couple of days to keep them thesty. Then put a lettuce leaf, moistened piece of bread, or damp Bounty paper towel or blue paper shop towel (rung out – re-wet and ring out as needed) in the container on top of the bedding. The larva will cover the bread or lettuce. Pick it up and shake them into a container in readiness for processing, feeding to poultry etc.
CLEANING OF HARVEST
Remove dead mealworms or dead beetles and the frass from the harvest. Dead larvae turn black. Dead pupae turn brown and shrivel up. Deformed beetles die early. Other dead beetles stop moving and their antenna crinkle up.
All these can be fed to poultry birds, processed into livestock feed or composted.
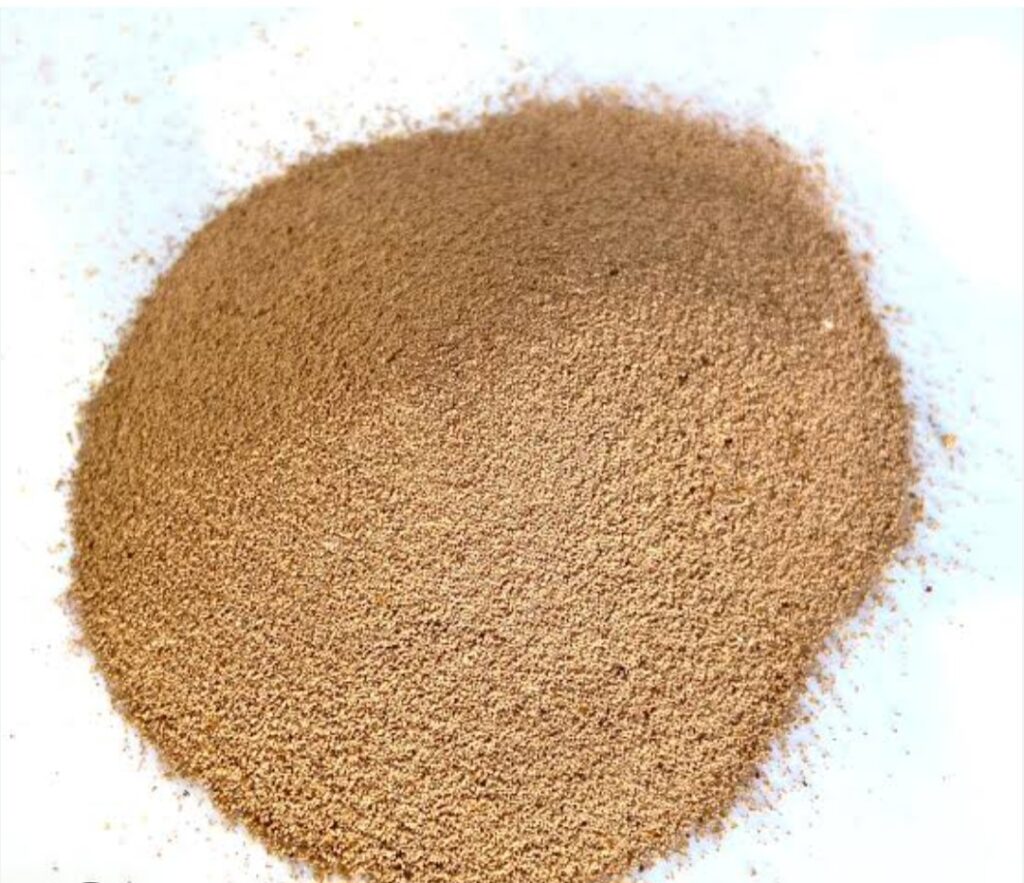
FRASS: As the mealworms consume the bran, a fine, dusty or sandy residue will settle out on the bottom. Eventually, shed exoskeletons and waste products (frass) will build up, and a slight ammonia odour may be detected. That means it is time to sift the grain to separate the worms and adult beetles (do not throw out tiny larvae or eggs); wash the container, add new grain, and return the worms to the container. This can be done at- least 3 times a year. If the frass builds up too much, mealworms may turn gray and get black stripes and then die.
The frass (waste) can be used as fertilizer for flowers or vegetables.
Excess mealworms may be found in the frass. They should be separated into a separate container for a bit. Some lettuce/cabbage can be placed on the frass to see if there are any mealworms that can be separated out.
PROCESSING OF MEALWORM
Meal worms can be processed after harvesting in two main ways.
1. Drying
2. Grinding
DRYING
Aftet harvesting, they can be dried using three methods;
a. Freeze roasting
b. Air drying
c. Use od dehydrator
a. Freeze Roasting: This is the technique used to freeze dry mealworms. Roasted mealworms do not require refrigeration, and do last more than a year in storage. This techniques involves getting large number of mealworms.
Put them in two large plastic containers on arrival and put them in the freezer. Once frozen and dead, heat up the grill on the lowest setting. Put the mealworms into a large disposable aluminum roasting pan, after sprinkling some corn meal into the bottom of the pan to prevent them from sticking to the bottom.
Put them on the grill, close the lid, and let them sit there for about 4-5 hours.
Again, put the grill on a very low setting (maybe only one burner on low) and shake them up every so often. They will turn brownish, but once they are cooked, they will not turn black and disgusting if left out in warm weather.
Once cooked, put them back in the freezer and use them as normal. This does not produce any smell.
Do not use a microwave for processing . If cooked indoor in the oven, it gets a little smelly.
b. AIR DRYING: The melworms are air dried with natural air blow or sundried.
c. USE OF DEHYDRATORS: The dehydrator is a machine that removes moisture from the mealworm and keep it dry. It preserves the nutrients and shelf life of the product
DUSTING: Dusting is one of the processing techniques used on the mealworm. The outer part of mealworms can be dusted with powdered mineral or vitamin formulations ( For example, powdered Calcium [Ca2+] or calcium-vitamin combinations) prior to feeding it to the livestock. The larvae or beetles should be put in a baggie, and gently shake them to coat them with the mineral-vitamin powder. Shake off excess before feeding to the animals.
GRINDING: After drying and dusting, they are grinded to powder form which can be as protein suppliments or mixed with pet food etc. Apart from this grinding, they can be mixed and molded into mealworm bars which pets can fewd upon.
PESTS
Small mammals, e.g. mice, hedgehogs, shrews, sugar gliders, moles, voles, marmosets, bats, rats and other insectivores. Scorpions, praying mantis, centipedes, large insectivorous spiders, etc.
Mites: Sometimes a mealworm colony gets infested by grain mites (Acarus sp.) The mites may come from the mealworm supplier, in bran, or litter from
poultry production, and may infest a colony that has been around for a long period of time. Excessive moisture with heat may be a contributor. They are prolific breeders (800 eggs/female) and can withstand temperatures of 0 degrees and still hatch when brought to room temperature. (Another species that can be a problem is the mold mite, Tyrophagus sp.)
The mites are tiny and round, whitish or tan in colour, and have eight legs. They may cling to air holes and look like very fine sawdust. Mites can not fly.
If the colony does become infested, the mites will kill the larvae and adults. Destroy the colony (e.g. by freezing) and start over.
Another pest is the Brown moths (typically Indian Meal Moths, a common pantry pest that infests birdseed and cereal) may be attracted to the mealworm bedding. If they get into the farm, they make a sticky web almost like cotton candy.
PREVENTION AND CONTROL OF MEALWORM PESTS
To prevent mite infestation:
i. It is also recommended that sterilization should be carried out on all bran/grain (by microwaving it or placing it in a subzero freezer for several days) prior to adding it to a colony to prevent mite introduction.
ii. Apart from the above, create a moat by placing the mealworm containers up on legs, and sit the legs inside small glass or plastic jars filled with water or glycerin (to prevent evaporation ). This will also keep ants out.
iii. Use a Vaseline band (a 2 inch wide band on the outside of the container just after washing and drying it) to prevent mites from getting into a worm bed.
iv. To prevent brown moths, some people store farms outdoors during warmer weather. Some put individual containers inside a larger bin with a screen hot-glued to the top.
v. A “pantry-pest” trap using pherhormones can be used to trap adult moths. Microwaving cereals (for example, 2 minutes), or freezing birdseed and cereals will kill moth larvae that may come in the packaged products.
So, if you’re already in with Fundalor, Fundalorlogin is where you probably wanna be. Get in there and win big, dude. Here’s the entry point:fundalorlogin
Hi,
Thank you for introducing fundalorlogin to supremelights. We will surely check it out.
Hope you find supremelights post useful. If you have any aspect of agriculture you want us to address, please, contact us.
Thank you.
Bye